
iBoysoft Drive Manager Review: The Best NTFS Driver and Disk Management tool for Mac
Almost everyone who works with computers, cameras, or other devices uses storage media. It could be an external hard drive, an SD card, a USB flash drive, or any other storage devices. Therefore, it is essential for us to have a disk management tool to manage our disks.
Among so many available products, iBoysoft Drive Manager is one of the most highly recommended tools because of its comprehensive ability to manage external drives and network drives on Mac. It is compatible with macOS 10.14/10.13/10.12 and Mac OS X 10.11/10.10/10.9/10.8/10.7.

Moreover, iBoysoft Drive Manager is also a good utility for people who use several different hard drives and cards on Mac. You can use this tool to mount and unmount many disks at the same time with a simple click of "Unmount All External Drives" or "Mount All External Drives". Compared with ejecting them one by one, it is timesaving and user-friendly.
To connect to a network that you have connected before, all you need to do is to launch iBoysoft Drive Manager. Then this network drive will be connected automatically.
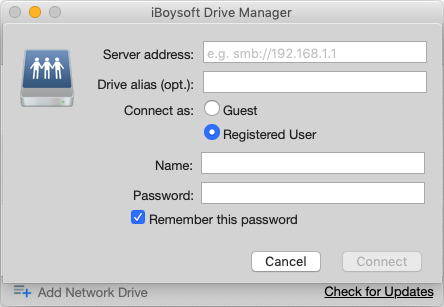
To add a new network drive, you can click the add +button at the dropdown bar, and then fill in the server address, name, password, and other necessary information. Then you can connect to your network drive after you click the Connect button. The most convenient feature is that you don’t need to connect to it manually next time, because it will also be automatically connected.
Moreover, you can choose to enable/disable the auto-mount feature in its Preferences to have a better experience.
Among so many available products, iBoysoft Drive Manager is one of the most highly recommended tools because of its comprehensive ability to manage external drives and network drives on Mac. It is compatible with macOS 10.14/10.13/10.12 and Mac OS X 10.11/10.10/10.9/10.8/10.7.
The following are three key features of iBoysoft Drive Manager.

1. External drives mounter
Many users have experienced disk corruption due to unsafe ejection, accidental removal, etc. iBoysoft Drive Manager can automatically mount your disk when it is plugged in, unmount the disk when your Mac gets into sleep mode, and remount this disk when your computer wakes up to prevent disk corruption.Moreover, iBoysoft Drive Manager is also a good utility for people who use several different hard drives and cards on Mac. You can use this tool to mount and unmount many disks at the same time with a simple click of "Unmount All External Drives" or "Mount All External Drives". Compared with ejecting them one by one, it is timesaving and user-friendly.
2. NTFS for Mac driver
iBoysoft Drive Manager is also a great NTFS for Mac driver to mount NTFS drives on Mac. As you may know, all external drives formatted with NTFS file system will be read-only on Mac because Apple disabled the NTFS write support in the Mac operating system. That's to say, you are unable to write to, edit, remove the files on NTFS drives on Mac. However, with iBoysoft Drive Manager, mounting NTFS drives on Mac in read-write mode will be as easy as pie.Here is how to mount NTFS drives on Mac in read-write mode with iBoysoft Drive Manager.
- Step 1: Download, install, and launch iBoysoft Drive Manager on your Mac.
- Step 2: Plug your NTFS drives into the Mac and wait for it being detected by your computer, just like you usually use an external hard drive.
- Step 3: When you get a notification that your NTFS formatted external hard drive is mounted successfully from iBoysoft Drive Manager, you can go ahead to write to this external drive on your Mac with full access.
3. Network drives mounter
Another key feature of iBoysoft Drive Manager is also eye-catching. It can easily map the network drive on Mac and let users access them like a local disk. The NAS (network attached storage) has brought many benefits to users, while the steps to manually make a network accessible on Mac are a little complicated. But iBoysoft Drive Manager makes this task easier than ever.To connect to a network that you have connected before, all you need to do is to launch iBoysoft Drive Manager. Then this network drive will be connected automatically.

To add a new network drive, you can click the add +button at the dropdown bar, and then fill in the server address, name, password, and other necessary information. Then you can connect to your network drive after you click the Connect button. The most convenient feature is that you don’t need to connect to it manually next time, because it will also be automatically connected.
Moreover, you can choose to enable/disable the auto-mount feature in its Preferences to have a better experience.
Social Plugin