Ad Code
Translate
Smart strategies for trading on crypto exchanges
October 20, 2025
Five Do’s For a Healthy Turnover That Bolsters Talent-Retention
October 20, 2025
Discover Honeybee Pharmacy (2025 Guide Important Consumer Tips)
October 14, 2025
What is Ozempic (semaglutide)? (Updated in 2025)
January 30, 2025
Posture Bra: Improving Back Support and Comfort
October 20, 2025
How To Find Suitable Properties In Cyprus?
October 20, 2025
10 Effective Strategies to Improve Domain Authority of Your Website
October 20, 2025
Fixed: Unallocated Space After Cloning HDD to Larger SSD
Khabza Mkhize
March 18, 2024
Have you ever cloned hard drive to SSD for better performance? Do you encounter unallocated space after cloning? If so, you may have a doubt why the cloned SSD has the same capacity of old disk and where is my extra disk space on SSD.
That’s because most disk cloning software will make an exact copy of original disk, so it will have the same size of your original disk, the remaining disk space is at the end of your SSD and shown as unallocated. You cannot see it in File Explorer.
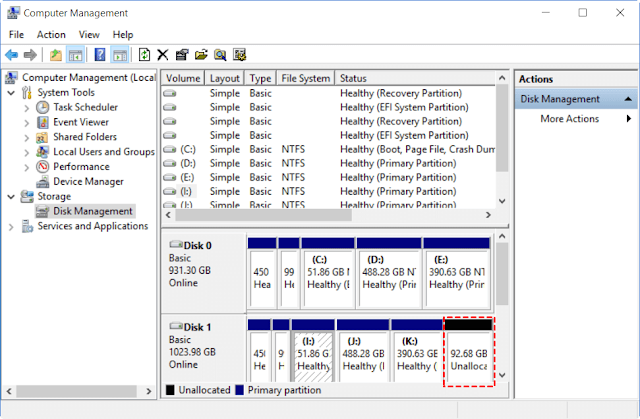
To confirm this situation, you can go to Disk Management, then you will find the remaining capacity of your SSD and it’s marked as Unallocated.
After having a general understanding of this issue, let’s have a closer look at how to fix unallocated space after cloning.
How to fix unallocated space left in Windows 7/8/10?
To fix unallocated space after cloning, there are two available methods prepared for you. The first one is to use free Disk Management while the second one is make use of third-party disk cloning software like AOMEI Backupper Professional. It’s 100% working solution. Still don’t know how to solve this issue, please try the 2 given solutions below.Method 1: Solve unallocated space left using Disk Management
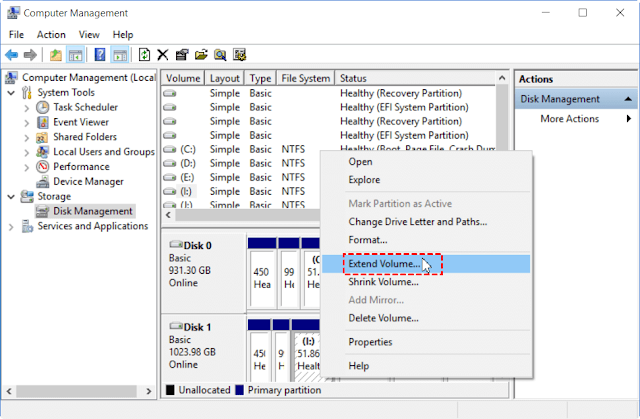
Disk Management is a free built-in tool for Windows 7/8/10 to help users fix disk or partition issue. Its useful feature “Extend Volume...” can fix the cloned hard drive unallocated space left. Here, Taking Windows 10 as an example, let’s start to extend volume.Step 1. Right-click on This PC and then select the Manage option. In the pop-up window, click Disk Management on the left panel.
Step 2. Right-click on the partition before unallocated space, then select Extend Volume and complete the process with the Extend Volume Wizard.
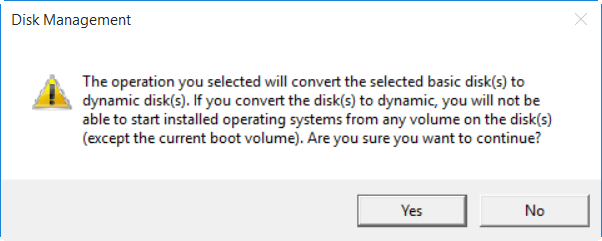
Note: If you extend the partition into non-continuous unallocated space, you may be asked to convert basic disk to dynamic disk. Please take it into seriously consideration in case you want to convert the disk to basic disk again and the operation is a little tricky.
Method 2: Clone HDD to larger SSD without unallocated space via AOMEI Backupper
If you still don’t clone the hard disk, you could consider using AOMEI Backupper Professional. It can help you solve this problem from the root.This software has an excellent feature called “Edit Partitions”, which allows you to adjust partition size of destination disk during the cloning process. And this feature has three option, including, “Copy without resizing partitions”, “Add unused space to all partitions”, and “Manually adjust partition size”.
Now, let’s see how it works. Before start, please make preparations at first.
- Create a disk image backup for your computer in case of disk failure. If you have done a deep research online, you may find many examples about cloned hard drive won’t boot. To avoid this issue, you need a backup image externally.
- Get a SSD disk with right size. Usually, SSDs will have different thickness and interface than HDD. Please check it on manual before you go out to buy SSD.
- Prepare a USB-to-SATA adapter to connect your SSD. Most SSDs use the SATA interface. If your SSD is NVME, you may need a M.2 to SATA or M.2 to PCIe connector.
To clone HDD to larger SSD, use the following steps.
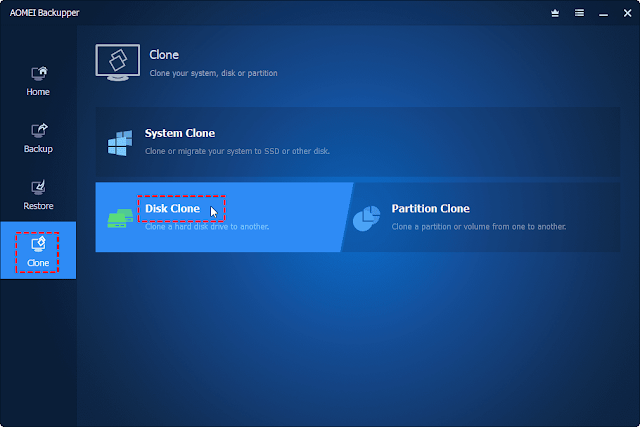
Step 1. Connect your SSD to computer and be sure it can be detected by Windows. If you are asked to format the disk, please do so.Step 2. Download AOMEI Backupper and install it on your computer. Then, open it, click Clone and Disk Clone in order.
Step 3. Select the HDD as source disk (here is disk 0), and click Next.
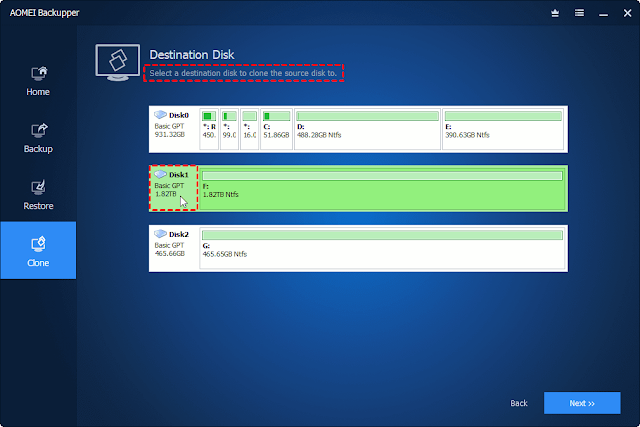
Step 4. Select the connected SSD as destination disk and save everything on the HDD. Then, click Next.
Step 5. In the Operation Summary window, confirm both disk information and click Edit Partitions to resize target disk space. After that, click Start Clone.
>> Copy without resizing partitions: This option is suitable two disks with the same size.
>> Add unused space to all partitions: This option adjusts the partition size automatically and allocates unallocated space to each partition on the destination disk.
>> Manually adjust partition size: This option allows you to add unallocated space to any partition you want on the target disk, even non-continuous. If the selected partition is system partition, you will be required to restart your computer sometimes.
Note:
It’s suggested to check “SSD Alignment” if the target disk is SSD. Because this feature can speed up the writing and reading speed of SSDs and extend its life span.
To make sure if the cloned hard drive shows full capacity, you can go to File Explorer and check the size of all partitions on target disk.
After successfully cloning HDD to SSD and ensure it has full capacity, you may want to boot from the cloned SSD. To make it, you need to swap hard drive using screwdriver, restart your computer and press the specific key when you see a prompt like “Press ESC to enter BIOS”, set SSD as the first boot option and press F10 to reboot. Wait and check if everything is OK.
Over to you
That’s all for unallocated space after cloning HDD to larger SSD. Above methods not only work on this situation, but also apply to clone disk to larger disk, clone SSD to larger SSD etc. The only premise is the target disk is bigger.
If you encounter any similar situation, you can use Disk Management to extend volume size or directly adjust partition size during the clone process with AOMEI Backupper.
Featured Post
DL Mining Launches Ethereum Contract Participation Service, Helping Users Earn $2K Stable Daily Returns
Zizo Gala-Mkhize-
October 20, 2025
Soapie Teasers
Sister Sites
Most Popular
List of 6,000+ Dofollow Commentluv Blogs FREE (Updated 2025)
January 16, 2025
Five Do’s For a Healthy Turnover That Bolsters Talent-Retention
October 20, 2025
How To Choose The Right Place For A Winter Campsite
March 06, 2023
Popular posts
List of 6,000+ Dofollow Commentluv Blogs FREE (Updated 2025)
January 16, 2025
Five Do’s For a Healthy Turnover That Bolsters Talent-Retention
October 20, 2025
What is Ozempic (semaglutide)? (Updated in 2025)
January 30, 2025
Footer Menu Widget
Created By Blogspot Theme | Distributed By Gooyaabi Templates




Social Plugin