Ad Code
Translate
Smart strategies for trading on crypto exchanges
October 20, 2025
Five Do’s For a Healthy Turnover That Bolsters Talent-Retention
October 20, 2025
Discover Honeybee Pharmacy (2025 Guide Important Consumer Tips)
October 14, 2025
What is Ozempic (semaglutide)? (Updated in 2025)
January 30, 2025
Posture Bra: Improving Back Support and Comfort
October 20, 2025
How To Find Suitable Properties In Cyprus?
October 20, 2025
10 Effective Strategies to Improve Domain Authority of Your Website
October 20, 2025
How to Recover Data from a Corrupted SD Card on Mac?
Khabza Mkhize
March 18, 2024
SD cards are a very popular photo storage device used in Android phones, digital cameras, and computers. And many users store their photos, videos, music and even apps on SD cards. However, SD cards are so fragile that they can be easily corrupted or damaged if improperly used. Usually, this situation initiates with an error message, like “the disk you inserted is not readable”. What’s worse, your SD card will not be showing up on Mac or stop working.

Under this circumstance, you have no chance to access data stored on the card anymore through a normal approach. Fortunately, it’s surprisingly easy to recover data from an SD card with the following tricks. Read on to see how it is done.
Solution 1: Recover Lost Data from Time Machine Backups
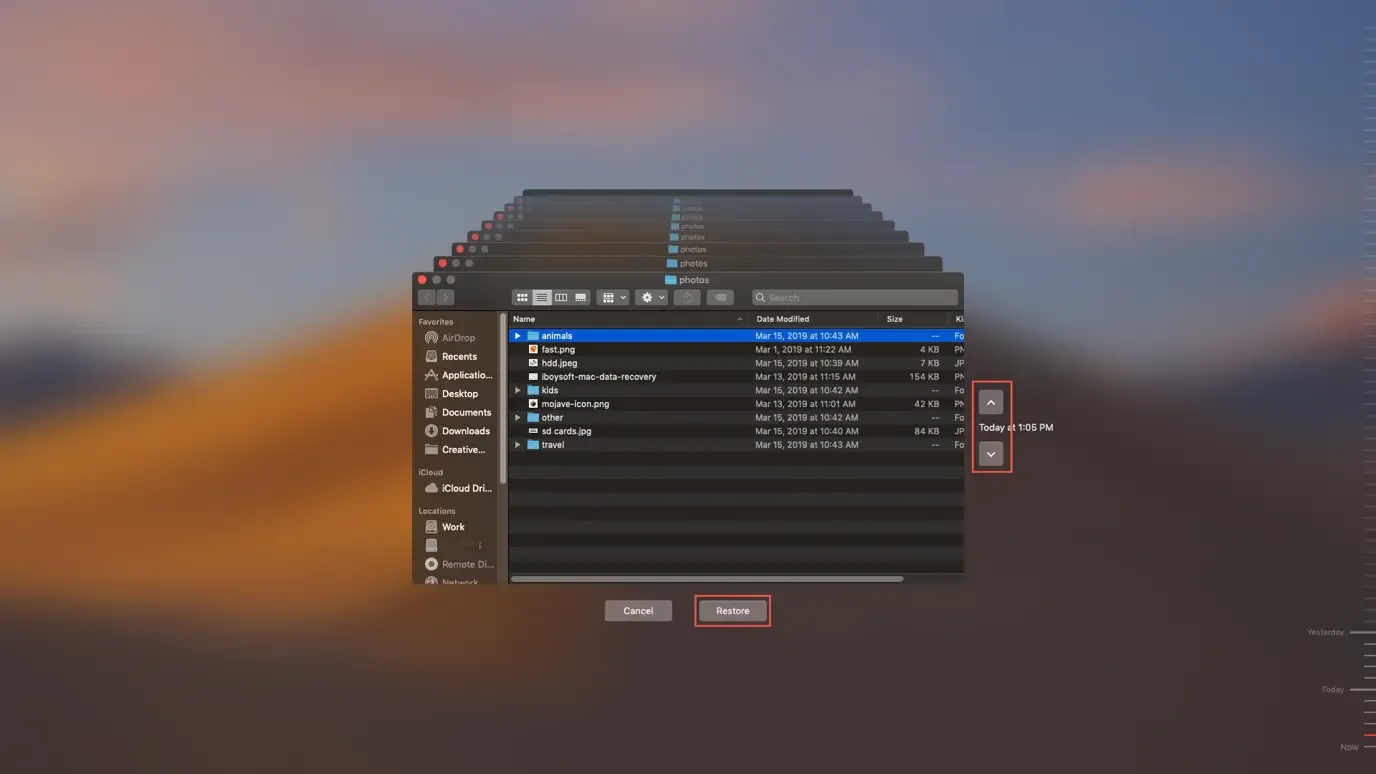
Time Machine is an Apple built-in app that makes it simple to back up your Mac data. If you have set up an external disk as a Time Machine backup disk, Time Machine will automatically back up all of your files, including apps, music, photos, and documents. Here’s how to restore from Time Machine backups.Step 1: Click Time Machine via the menu bar shortcut. If you don’t see the option in the menu bar. Select System Preferences from the Apple menu. Choose the Time Machine icon and click Show Time Machine in menu bar.

Step 2: Once you’re in Time Machine, open the folder where you lost the file on the left side of the window.
Step 3: Scroll down the window for the files you have lost.
Step 4: Select files and click the Restore button.

Solution 2: Use Free Data Recovery Software
iBoysoft Data Recovery for Mac is a popular Mac data recovery tool and we recommend it as a must-download if you are storing anything important on your SD card. The software can be used to recover lost data from unreadable, corrupted, mistakenly formatted, and inaccessible SD cards. Moreover, it can even recover data when your Mac won’t boot.The software is designed with compatibility in mind. It works with all types of storage media, including memory cards, internal hard drives, external hard drives, and USB flash drives. All the latest versions of the Mac operating system are supported, ranging from OS X 10.7 to macOS 10.15.
Here’s how to recover data from a corrupted SD card using iBoysoft Data Recovery for Mac:
Step 1: Free download and install iBoysoft Data Recovery for Mac.
Step 2: If you don't have an SD card slot, connect your SD card to your computer using a card reader.
Step 3: Launch the application and select the SD card from the list of disks that the program has discovered.
Step 4: Click the Scan button to search the SD card for recoverable files. During the scan process, you can pause or stop the scan, check the results, and resume scanning as you want.

Step 5: Choose files you hope to restore and a storage location where the data will be saved and click Recover. With iBoysoft Data Recovery for Mac, you can use the advanced filter features to quickly target files by filename, extension, file size, created date, etc. When you find the files you need, you have the option of previewing them.
Note: Please don’t save the files back to the SD card to avoid further file corruption.

Conclusion
Although SD card corruption is inevitable, you can take precautions to prevent SD from becoming prematurely corrupt. In addition, backing up your files from an SD card is also essential. However, if any data loss scenario happens, don’t worry. You can restore lost data from Time Machine backups. Moreover, you can get data back with iBoysoft Data Recovery for Mac easily and efficiently.Featured Post
DL Mining Launches Ethereum Contract Participation Service, Helping Users Earn $2K Stable Daily Returns
Zizo Gala-Mkhize-
October 20, 2025
Soapie Teasers
Sister Sites
Most Popular
List of 6,000+ Dofollow Commentluv Blogs FREE (Updated 2025)
January 16, 2025
Five Do’s For a Healthy Turnover That Bolsters Talent-Retention
October 20, 2025
How To Choose The Right Place For A Winter Campsite
March 06, 2023
Popular posts
List of 6,000+ Dofollow Commentluv Blogs FREE (Updated 2025)
January 16, 2025
Five Do’s For a Healthy Turnover That Bolsters Talent-Retention
October 20, 2025
Discover Honeybee Pharmacy (2025 Guide Important Consumer Tips)
October 14, 2025
Footer Menu Widget
Created By Blogspot Theme | Distributed By Gooyaabi Templates

Social Plugin