
How to Take a Complete Backup of Your WordPress Blog

Do you have a backup for your website or blog? And if your answer is no.
Then this is the right time to take steps to safeguard your blog. Don’t wait for the additional activity to happen to your site or blog.
Yes, you heard it right. It’s possible to create a full backup of your blog based on WordPress.
If you think your web host has a backup for your website. You’re sadly mistaken; you can’t trust your web host to have a backup. You need your own automated backup, and it happens on a schedule.
Ensure your website backup is not on the web hosting provider’s servers. As any kind of bad thing can happen on the internet.
Even web hosting providers can have hardware failures, and everything can get wiped out.

But when we upload the files, we sometimes get permission errors in WordPress. So creating a WordPress backup with backup plugins like “UpdraftPlus” is an easy and lossless method.
Let me know your thoughts in the comment section below.
So it’s essential to back up your site or blog without depending on web hosting providers.
I’ve experienced and seen all these things happen in my WordPress blog. I just want you to not be a victim.
In this article. I will show you how to take a backup of your WordPress-based blog, which is automated and offsite.
So without wasting any time, let’s get started!!
Well, there are a lot of backup solutions available out there on the internet. I’ve used them all, and this is the only one I’d trust to build a backup of my blog. I would also recommend you guys, as this plugin works fine.
I’ve even used some high-paid backup plugins; restoring my backup was a nightmare.
As there were so many unexpected failures during the backup process.
This is the only backup solution I’ve found that can handle anything I throw at it and have never let me down.
I’ve even used this to back up a website over 8 GB in size, and UpdraftPlus had no problem.
Okay, enough of me talking. Let’s get it and install it on your WordPress blog.
Step 1: First of all, open the dashboard of your WordPress blog. Now go to “Plugins” and click on “Add New”.
Step 2: Now search for “updraft plus” in the search box.
You will see these kinds of results. Once you locate the UpdraftPlus plugin, click on the “Install Now” button. Then, click on the “Active” button, which will begin the plugins on your WordPress.
Step 3: It will add a new option called “UpdraftPlus Backups” under “Settings”. Once you find out that option, just click on it.
Step 4: By clicking on “UpdraftPlus Backups”, the UpdraftPlus Backup/Restore page will open. Over that page, go to “Settings”.
So WordPress is a bunch of files and a database. Now the data don’t change that much, but whenever you add a page or post in your database. So we’ll have different backup frequencies for these two things.
For the files that don’t change often, so set up your “Files backup schedule” as,
And for the “Database backup schedule”, set up the same as I’ve mentioned below,
Keep in mind that deciding on scheduled backups is entirely up to you.
Step 5: The next step is to choose which remote storage solution to store this backup.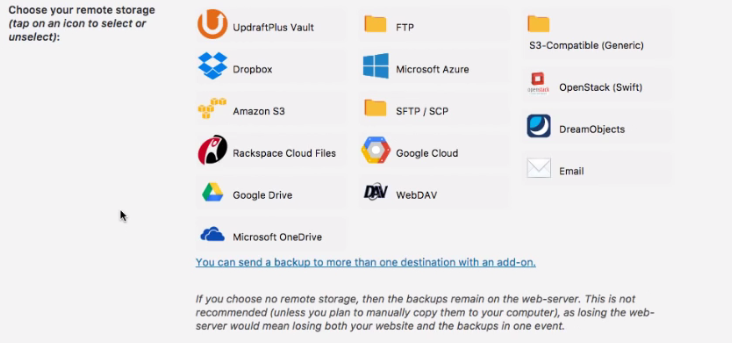
Here I’ll recommend you use Dropbox. It provides 2 GB of free backup space and an extra 250 MB on each reference. So go ahead and click on “Dropbox”.
After selecting Dropbox, you will have to complete the authentication with Dropbox.
Now tick the checkbox opposite “Email” to get email notifications.
Leave the other settings without changing them; finally, scroll down the page and click on the “Save Changes” button.
Step 6: By clicking on the Save Changes button, you will get the notice like this,
This notifies you to make the connection between UpdraftPlus and Dropbox. To do that, go ahead and click on the link located on the notification bar.
This link will take you to the Dropbox login page to log in to your account and establish the connection.
Note: If you don’t have a Dropbox account, you must create one immediately to establish the connection with UpdraftPlus.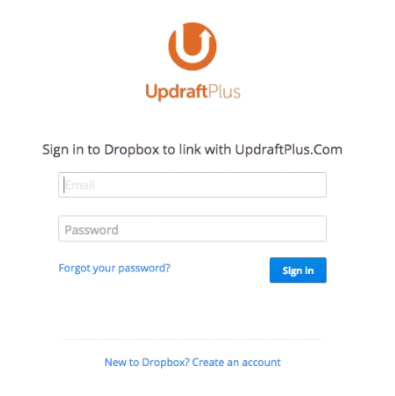
Step 7: Once you log in to your account, you’ll be able to see this page; just click on the “Complete Setup” button.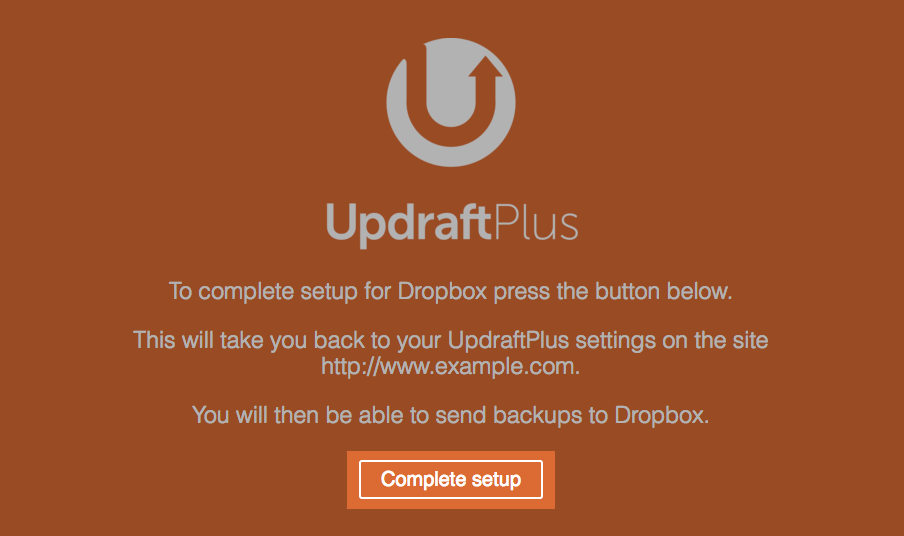
Now it will show you that you’ve successfully authenticated your Dropbox account.
I’ve experienced and seen all these things happen in my WordPress blog. I just want you to not be a victim.
In this article. I will show you how to take a backup of your WordPress-based blog, which is automated and offsite.
So without wasting any time, let’s get started!!
Method #1: Creating Backup Using “UpdraftPlus” Plugin
So we’re going to use a free plugin called “UpdraftPlus”. UpdraftPlus is a free plugin and is used on more than a million WordPress-based websites as well.Well, there are a lot of backup solutions available out there on the internet. I’ve used them all, and this is the only one I’d trust to build a backup of my blog. I would also recommend you guys, as this plugin works fine.
I’ve even used some high-paid backup plugins; restoring my backup was a nightmare.
As there were so many unexpected failures during the backup process.
This is the only backup solution I’ve found that can handle anything I throw at it and have never let me down.
I’ve even used this to back up a website over 8 GB in size, and UpdraftPlus had no problem.
Okay, enough of me talking. Let’s get it and install it on your WordPress blog.
Creating a Complete Backup of Your WordPress Blog
Step 1: First of all, open the dashboard of your WordPress blog. Now go to “Plugins” and click on “Add New”. |
| Plugins |
 |
| updraft plus |
 |
| Activate UpdraftPlus |
Step 3: It will add a new option called “UpdraftPlus Backups” under “Settings”. Once you find out that option, just click on it.
 |
| UpdraftPlus Backups |
Step 4: By clicking on “UpdraftPlus Backups”, the UpdraftPlus Backup/Restore page will open. Over that page, go to “Settings”.
 |
| UpdraftPlus Backup / Restore |
So WordPress is a bunch of files and a database. Now the data don’t change that much, but whenever you add a page or post in your database. So we’ll have different backup frequencies for these two things.
For the files that don’t change often, so set up your “Files backup schedule” as,

And for the “Database backup schedule”, set up the same as I’ve mentioned below,

Keep in mind that deciding on scheduled backups is entirely up to you.
Step 5: The next step is to choose which remote storage solution to store this backup.

Here I’ll recommend you use Dropbox. It provides 2 GB of free backup space and an extra 250 MB on each reference. So go ahead and click on “Dropbox”.
After selecting Dropbox, you will have to complete the authentication with Dropbox.
Now tick the checkbox opposite “Email” to get email notifications.
Leave the other settings without changing them; finally, scroll down the page and click on the “Save Changes” button.
Step 6: By clicking on the Save Changes button, you will get the notice like this,

This notifies you to make the connection between UpdraftPlus and Dropbox. To do that, go ahead and click on the link located on the notification bar.
This link will take you to the Dropbox login page to log in to your account and establish the connection.
Note: If you don’t have a Dropbox account, you must create one immediately to establish the connection with UpdraftPlus.

Step 7: Once you log in to your account, you’ll be able to see this page; just click on the “Complete Setup” button.

Now it will show you that you’ve successfully authenticated your Dropbox account.
We’ve completed the setup, and now we’re good to go. You don’t need to do anything now, as it’ll automatically make a backup according to that schedule.

Conclusion
There are various other ways to migrate your website data from one destination to another. You can also download the MySQL data and files of your public_html content and upload them on the new server.But when we upload the files, we sometimes get permission errors in WordPress. So creating a WordPress backup with backup plugins like “UpdraftPlus” is an easy and lossless method.
Let me know your thoughts in the comment section below.
Social Plugin